Did you know? Azure has the world's most expansive cloud footprint, with over 300 secure datacenters in 60+ regions. But what does that mean for your cloud bill?
For C-suite managers, there’s a new challenge in the market. Every business is deploying AI in its workflows, and integrating a new AI is a significant challenge.
However, a bigger problem arises companies spend millions of dollars not just on AI but on cloud costs. Currently, the onus falls on the Leaders. Their hands are tied; they need to move as fast as the competition does, but they also need to see their budget. Sometimes the best solution is cloud migration.
The best part is that 90% of enterprises are already running Active Directory and Windows Server, but they are not seeing the simple solution. Most of them can actually opt for cloud migration because they can migrate their existing Windows and SQL servers to Azure, which allows them to activate the Azure Hybrid Benefit, reusing licenses they already own.
This single move can reduce the cost by 72%, freeing budget for new AI compute.
It also solves a technical problem. By consolidating core data on the same platform as their advanced AI tools, companies stop paying premiums for old systems and gain instant access to the Azure AI Foundry, where they can build, test, and deploy AI models securely in the same environment where their data lives.
Before you can manage costs, you should get a fair understanding of how they are incurred. Let’s see the biggest changes while moving from an on-premises data centre:
In the on-prem model, you are working in a CapEx cycle. You make a big initial investment to purchase physical infrastructure: servers, networking equipment, storage arrays, power, cooling, and real estate. You purchase hardware according to your requirements, like:
Peak predicted demand, meaning much of that expensive hardware sits idle.
Azure flips this model entirely. It operates on a consumption-based model, often called
Pay-As-You-Go (PAYG), also known as a consumption-based model. This is pure OpEx.
What it means in practice:
This elasticity is the key economic advantage, but it also poses a risk to the resources that have been left running and forgotten.
Azure offers a way to help you learn at either no cost or low cost.
Free Tier account: Free Tier means you have access to some free products within the first 12 months (such as 750 hours of a Windows VM and Azure SQL Database). It also provides a
First 30 days $200 credit to use on virtually any service, and a separate list of what qualifies under Always Free up to some limit (such as Azure Functions up to 1 million requests and Azure Kubernetes Service cluster management).
Understanding this foundation is the first step. Your primary cost levers are shifting from this flexible PAYG model to commitment-based models, which we'll cover in the next few sections.
Understanding the PAYG model is the first step. Your next logical question would have to be: "But what is my environment going to cost when I move it?" And you need more than just a number, you should be able to forecast this very spend. Azure provides two primary tools for this planning phase:
TCO Calculator is your first stop to get a high-level, and directional estimate. This tool is meant to be used for meeting planning activities in the early stages where you need a ballpark idea of what savings might be possible. You manually enter your existing on-premises inventory; the TCO calculator generates a high-level estimate of what your estimated savings would be if you were to migrate that environment to Azure.
When you're ready for a precise, data-backed business case you need to use
Azure Migrate. This is not merely a calculator; rather it is a trusty full assessment and planning platform to provide you with the extremely accurate business case number for your particular workloads.
A much more sophisticated process than the TCO calculator is:
Discovery: Azure Migrate discovers your full data centre inventory, including workloads that run on VMware, Hyper-V, and even on other public clouds such as AWS.
Business Case Generation: Once it finds out your inventory, Azure Migrate creates a detailed business case comparing your current operational costs to your future Azure state. This report DNS will often turn out to be pretty significant savings, for example, in a sample scenario you can see an infrastructure cost saving of up to 68% creating a saving of millions of dollars a year for an organization.
Modernization vs. Migration: This is arguably its most powerful feature. Azure Migrate doesn't just assume a "lift-and-shift" (moving a VM as-is, or IaaS). It actively analyzes your workloads for modernization opportunities, such as identifying a SQL Server VM that could be migrated to a more cost-effective and automated Azure SQL Database (a PaaS offering).
Automatic Incentive Discovery: Critically, the tool automatically scans for cost-saving opportunities. It identifies precisely which servers are eligible for unique Azure incentives like Azure Hybrid Benefit and Extended Security Updates (ESU).
Once you have this data-backed business case, you can export it for stakeholder sign-off, giving your team full confidence in the migration plan and its projected budget.
Before you deploy your first workload, you'll need to have governance in place. Most runaway costs stem from one root issue: not setting up your environment correctly from the start.
This starts with the Cloud Adoption Framework, a set of best practices that helps you get set up.
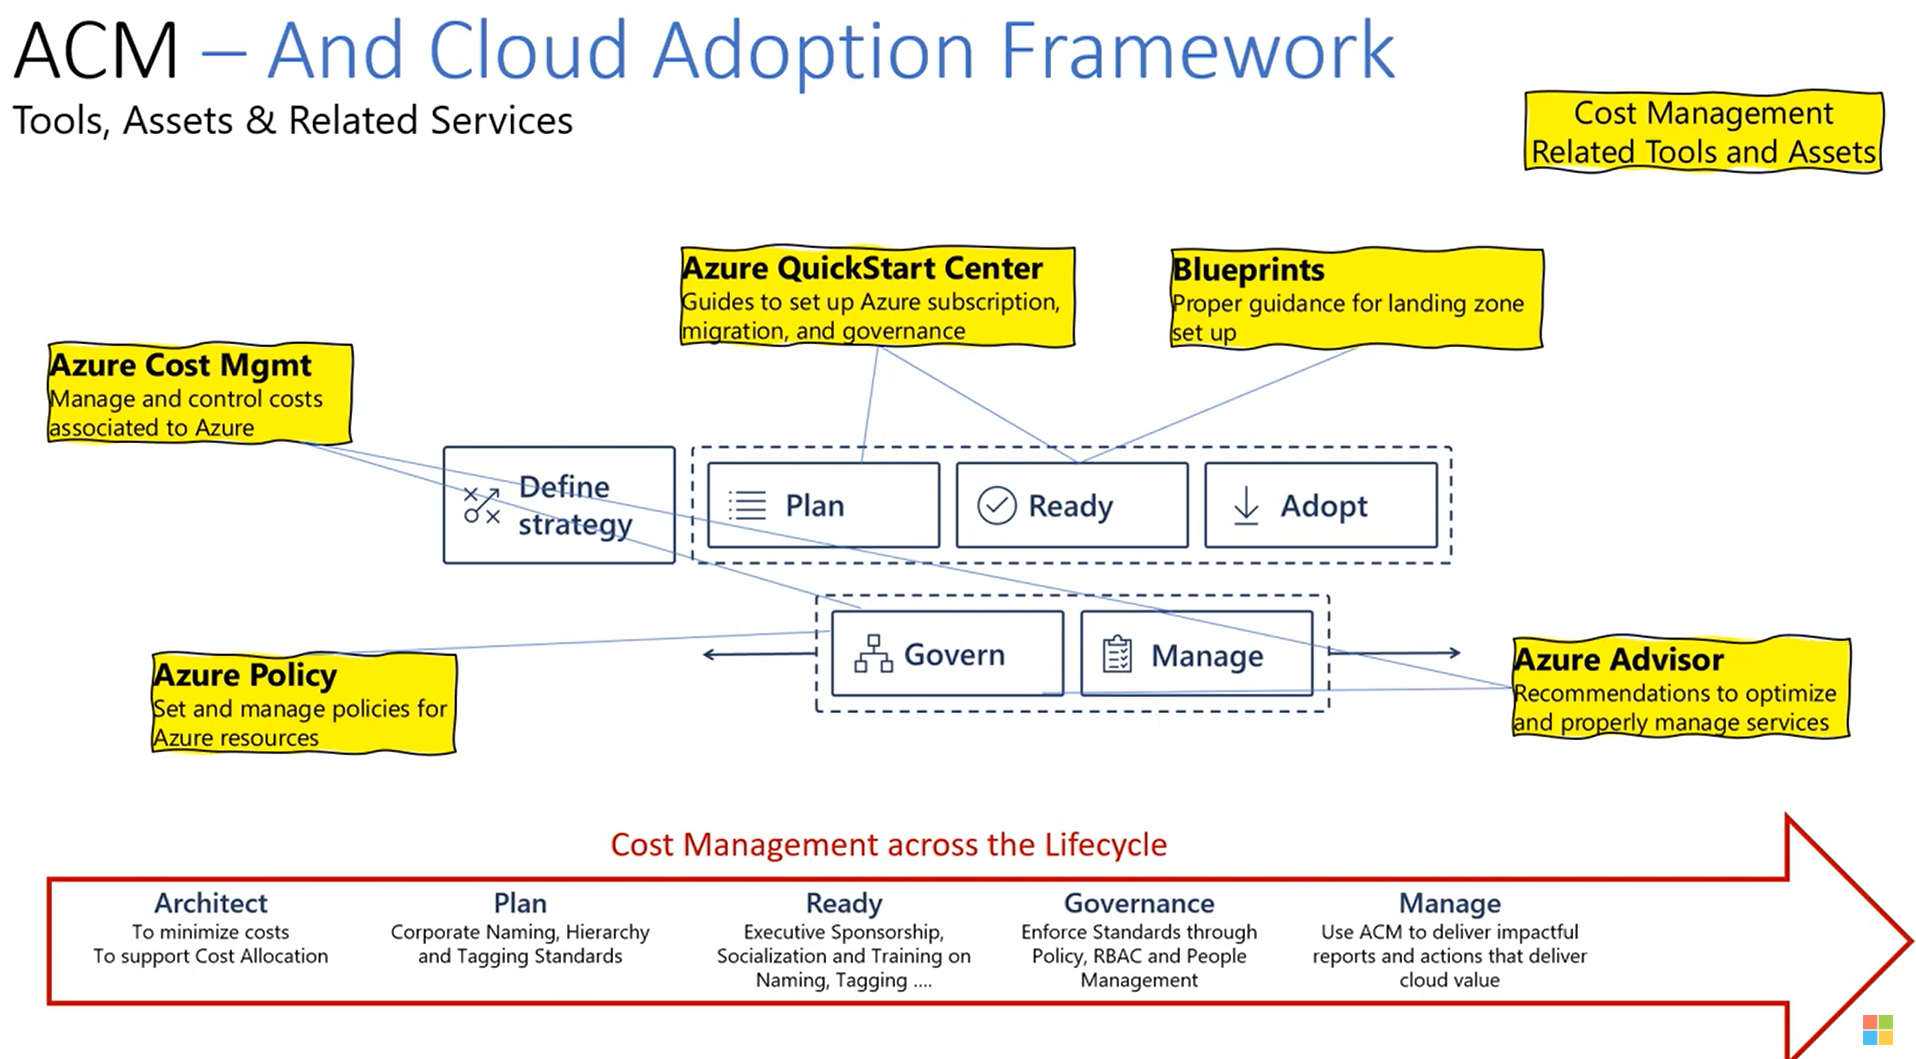
Your foundation needs an understanding of 3 things: Hierarchies, Tags, and Access.
Your Azure environment is organized into two separate and largely unrelated hierarchies. This separation is a common point of confusion.
This Hierarchy determines your invoice structure, and how your costs are defined at the highest board group (or your top-level cost groupings). How this looks depends on how you buy Azure.
Billing Account, which contains one or more Billing Profiles. Each profile gets its own separate invoice and can even be billed in different currencies. Under each profile are Invoice Sections used to organize costs on that invoice.
It is separate from billing. Its primary purpose is not billing; it is for
Since your operational hierarchy (Management Groups) may not match all the ways you want to report costs (like by cost center, project or app),
tags fill this need.
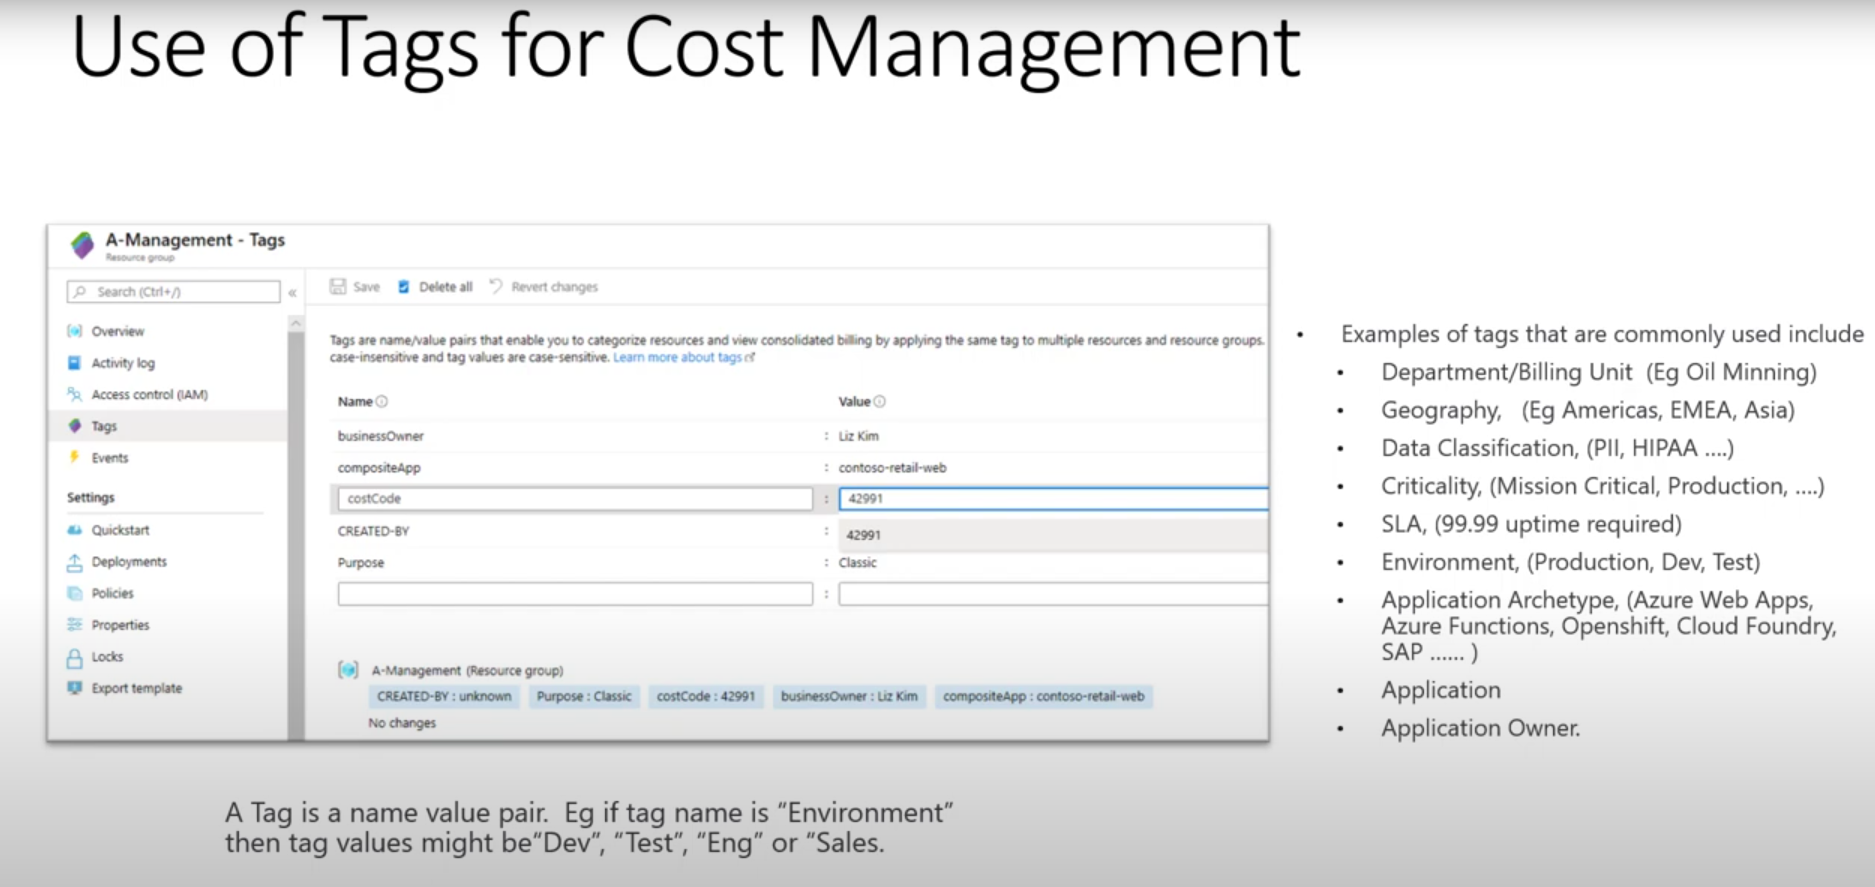
A tag is simply a
key-value pair of metadata which you add to Azure resources. Tags give you the ability to logically group resources into multiple taxonomies. For example, one VM might be tagged:
While you are limited to 50 tags per resource, standardizing on a few key tags like Owner, Cost Center, and Department is essential. If all "HR" resources are tagged, you can easily filter or group by the
CostCenter tag to view a complete cost report for that team, regardless of whether their resources are located across many subscriptions.
With your hierarchies captured, you will need to manage who can see and manage costs. Access control prevents stakeholders from potentially seeing data they shouldn't if they aren't allowed access to other functions.
Access in Azure is controlled by assigning:
For cost management Azure offers two special RBAC roles:
Billing Hierarchy Access: Access to the billing scopes are managed separately.
A governance plan doesn't help you much when nobody tags anything. If you don't tag resources when they're created, you end up seeing a huge untagged mysterious number in your cost reports, which defeats the whole purpose of your cost analysis.
You enforce good data hygiene by using:
Azure Policy: Azure Policy enforces rules and effects for your resources to ensure they'd stay compliant with corporate standards. For cost management you can set up and apply tag policies, including:
You may bundle several policies together as one "Initiative". For example, you could create a "Billing Tags Initiative" that came include policies to require "CostCenter" and "Product Name" tags on all new deployments.
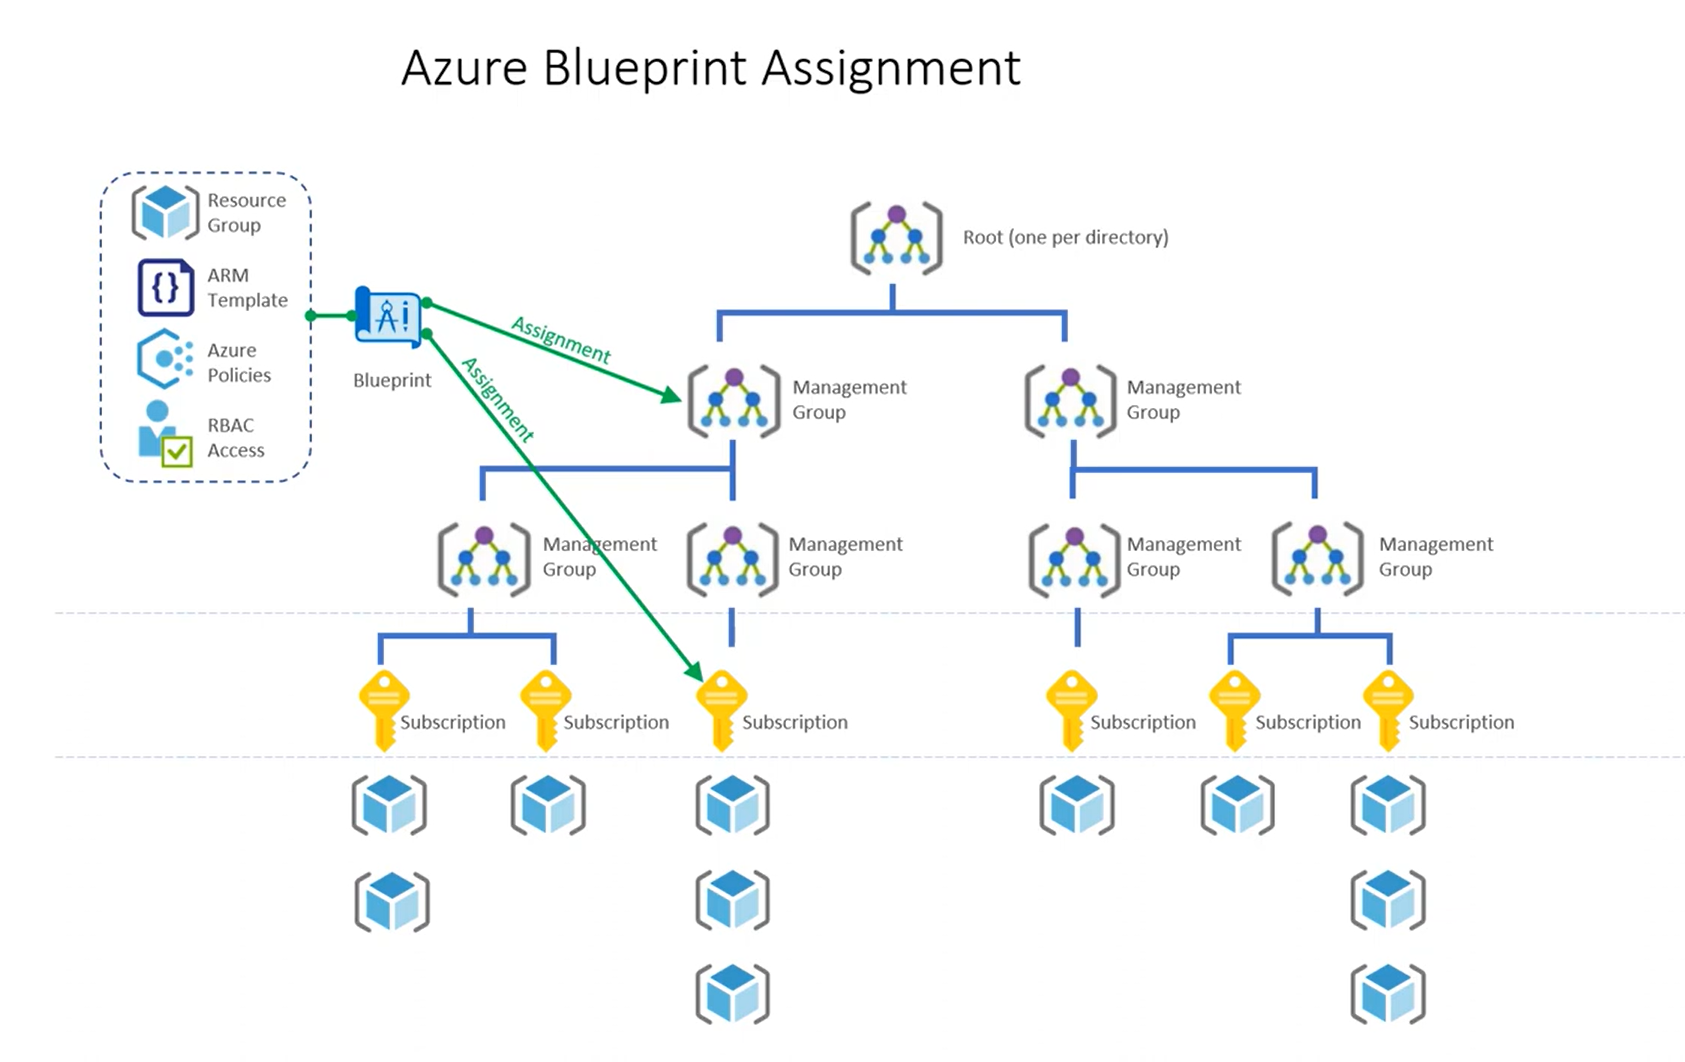
To go one step further, Azure Blueprints allows you to package and deploy entire, standardized environments. A blueprint is a reproducible set of artifacts that consist of Role Assignments (RBAC), Policy Assignments (such as your Tagging Initiative), ARM templates and Resource Groups. This guarantees every new environment is deployed with full compliance of your governance standards right from the start.
After your environment is controlled and workloads are deployed, your endless cycle of visibility and accountability begins.
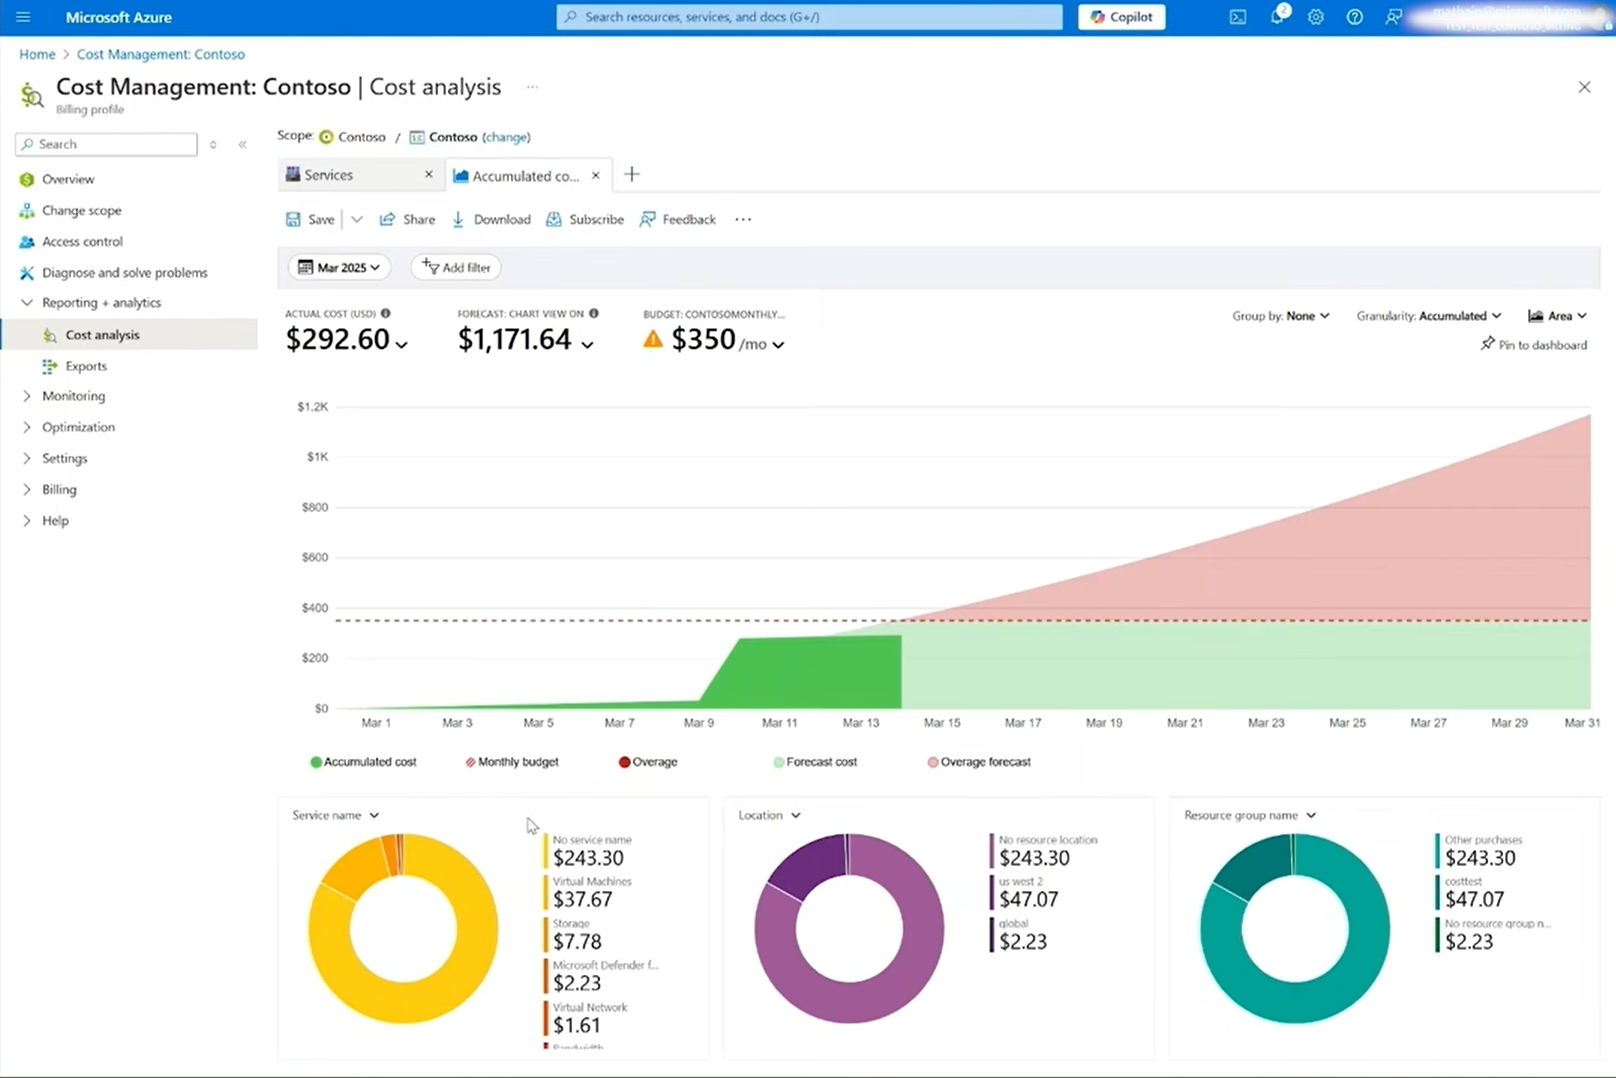
Cost Analysis is your primary tool and first stop in the Azure portal in understanding what you're spending and where. It offers its own built in views and deep customization to visualize and analyze your cost.
When you open the Cost Analysis, you pick your
scope (as in subscription or billing account). You're initially presented with an accumulated cost view for the month, often with unisMuse-Circle breaking down spend by key dimensions, such as Service, Location, and Resource Group.
From here, you can:
Visibility makes way for accountability: In Azure Cost Management you can create
Budgets for any scope.
A budget specifies a dollar figure (e.g. $1,500) for a certain period of time (typically monthly, restarting monthly). The real power of budgets derives from
Alerts. So, you can set it up so that when your spending reaches a certain percentage (actual or forecast) of your budget, like 90%, you get alerted that that's happening.
These alerts could send an email to specific recipients, or more powerfully, send an alert in the form of a
Action Group. This affords you enormous programmatic flexibility, in that a budget threshold alert can:
This system notifies you before you get over budget, not after
Your governance is strong, your budgets are telling you, and the reports are precise in their accuracy. But the bill is still too high. This is the optimization phase of your savings, which is when you actively cut your spending.
Your main weapon for proactive optimization is
Azure Advisor. Azure Cost Management integrates directly with Advisor, to provide specific cost recommendations
This tool emulates your own self-improvised automated consultant for your cloud services, examining the telemetry about your use to identify waste. The most common-and most impactful-cost recommendations are:
Beyond proactive fixes, your biggest savings are made by espousing the pay-as-you-go strategy with its breakout costs - purse strings.
1. Azure Hybrid Benefit (AHB): This is one of Azure's most strategic offers. If you already own on-premises Windows Server or SQL Server licenses that have active Software Assurance, AHB enables you to "bring your own license" (BYOL) to the cloud. This lets you
Don't double up costs by including the cost of the software license in the cost of your VM; just pay for the base compute infrastructure
2. Reservations (RIs) and Savings Plans For any stable, predictable workload, you want to use a commitment-based plan.
3. Spot Virtual Machines: For workloads that are interruptable (like batch processing or dev/test environments), you can use Azure's unused compute capacity for as much as 90% off. However, these VMs are stopped by Azure with very short notice.
These offers are not exclusive. The "ultimate combo" is to place Azure Hybrid Benefit atop a Reservation or Savings Plan. AHB subtracts the software cost, reserving starts at the base compute rate and discards the rest of it, that's absolute maximum savings.
As organizations move to the cloud, effective cost management becomes a critical, continuous business function. This entire lifecycle, from initial architecture and strict tagging policies to granular analysis, budget alerts, and proactive optimization is the key to moving beyond just
seeing your cloud bill to actively controlling it.
But as we've walked through this chronology, one thing becomes clear: this is a lot of manual work. It requires constant dashboard monitoring, deep expertise in billing hierarchies, proactive policy management , and regular meetings to act on Advisor recommendations. You have to manually build your chargeback reports, manually analyze spikes, and manually decide when to buy Reservations.
This is where the native tools provide the data, but the final step in the FinOps journey is automation.
While the Azure portal tells you what’s happening, Costimizer goes a step further to explain why it matters and then fixes it for you. Costimizer is an Agentic AI platform that automates the entire FinOps lifecycle, so instead of tracking dashboards, you focus on outcomes. Its agents work around the clock, cutting costs faster and smarter than native tools.
Here’s what Costimizer brings to the table:
With Costimizer, your FinOps team shifts from being cost analysts to architects of a fully automated savings system.
They serve two separate purposes. The
Billing Hierarchy (like EA Departments or MCA Invoice Sections) defines your invoice structure and how you pay.
Resource Hierarchy (Management Groups) defines your operational structure and is used to manage policy and access control (RBAC) across your resources. They are intentionally separate so you can change how you buy Azure (billing) without having to reorganize how you manage your actual resources (operations).
Actual Cost shows the raw charge as it happens. If you buy a 1-year, $1,200 Reservation on January 1st, your Actual Cost chart shows a $1,200 spike on that day.
Amortized Cost takes that same purchase and spreads it evenly over its term. That same purchase would appear as a $100 charge every month (or ~$3.29 per day). You must use Amortized Cost for accurate internal chargebacks.
If you are an Enterprise Agreement (EA) customer, this is almost always a permissions issue in the EA Portal. For any user who is
not a top-level Enterprise Admin to see costs, an Admin must log in to the EA portal (ea.azure.com) and manually enable two flags: "DA (Department Admin) view charges" and "
". If those are disabled, all other users are blocked from seeing cost data by default.
A resource can only be in one Resource Group, but it can have up to 50 tags. Your Resource Group hierarchy is a single organizational tree. Tags allow you to create
multiple, virtual hierarchies that overlay your environment. For example, you can't group resources by "Production" and "HR Department" at the same time using only resource groups, but you can easily do it with tags by filtering for
Environment:Prod AND CostCenter:HR.
Commitments. Moving predictable workloads off the expensive pay-as-you-go (PAYG) rate and onto
Reserved Instances (RIs) or Savings Plans (saving up to 72%) is the single biggest lever you can pull. The "ultimate combo" is stacking this commitment with the
Azure Hybrid Benefit (AHB) (bringing your own licenses), which gives you the absolute deepest discount possible.
Table of Contents
Explore our Topics
Having delivered value from Day 1, customers have literally texted us that we could charge them, but Costimizer continues to be a free product for our customers